Sunday 30 December 2012

Seat Belt Anchorage

Today's job was to repair the rotten metal around the seat belt mount/anchorage. The mount itself is a thick piece of steel held in place with just four of Speke's best spot welds (and you know how good they are!). Once I got in there with a chisel, the plate pretty much fell out leaving a ragged hole.

 
The seat belt mount and hole.
 
After removal and a quick clean & paint.

The mount was in re-usable condition after it had been cleaned and painted.

Here you can see the extent of the metal which had to be cut away before sound metal was found.
With the help of the grinder and a file, I was able to square off the hole to a much bigger, albeit solid, er...hole. Next step was to make a plate which was then welded in the hole, then another hole was drilled through it to accommodate the seat belt anchor bolt. Using the bolt to hold everything together, the mount was then offered up to the new metal and welded in.
A plate was welded in, then a hole drilled through the centre.

Finally, the mount was offered up (making sure the bolt went through the hole ok and on into the captive nut).
 After I had done that job, I put some more paint on the underside.

Friday 28 December 2012

Rear Wing - Nearside - Part 6

Spurred on by Kent Sandiford's email, I decided to venture back into the garage today to fix up the rear wing area. There was a lot of prep to do, from grinding down edges to be welded to drilling holes for spot welds.

I don't have many photos unfortunately, and those that I do have were taken whilst the car was turned on its side on the spit. However, I will try to talk you through it.

Basically, I clamped everything up and went for it. There, that's it! None of it was too difficult, although the lower leading edge of the wing, where it meets the sill, was pretty tricky as it is in a box section which made getting the MIG torch in there pretty hard. The troublesome rear inner and outer lower sill panels finally came good, even though they still don't fit right to be honest - a lot of bending had to be done. I used a combination of MIG plug and seam welds here, plus spot welds.


Rear lower sill panel (outer & inner) welded in place with a combination of MIG and spot.
The rear wing arch lip was plug welded, then the welds were ground down and treated to a skim of filler. Inside the boot all was well, with the new section of boot floor going in nicely. I didn't weld the boot gutter channels or rear lamp panel to the rear wing, as I think I am going to change the rear lamp panel at some point soon.


Boot floor repair and lower rear edge of rear wing welded in place.


Outer arch plug welded to the inner arch.
One "minor" point is that the door does not now fit very well, even though it did when clamped up. Oh well, I will deal with that later. I am sure some shims and some brute force will help. I also came across some nice holes in the "inner" inner wheel arch, especially around the seat belt anchorage. Another job to do.

Rot around the seat belt anchor plate.
Some more near the rear strut.


TR7 Design Proposal - Part 2

Hi folks

One of the things I have realised about restoring a car is that sometimes you have to know when to quit for the day, as things always look better in the morning. Another is to break a job down into chunks, so that when you go back the next time a lot of it is already done. Another is that doing the job can become a very solitary affair and that we all need a bit of motivation from others every now and then.

Never having been a fan of classic car clubs, I recently found myself going against my own grain and joining the TR Drivers' Club. What an epiphany! I now feel like I am in a little family of TR7 owners, all obtaining great enjoyment from whatever they (we) do with their TRs, although in my case I can only dream of the "driving" bit. After an email conversation with the club's John Clancy, masterminded by Simon at Robsport and in connection with my Austin-Morris styling sketch for a TR7, I decided to join. Now I have a childish thrill of anticipation when the club magazine arrives each month and enjoy very much reading its contents cover to cover. 

Incidentally, it turns out that the sketch is a genuine Harris Mann affair! How do I know? Because John sent the link to Harris who then telephoned John in amazement that his trace drawing had survived all these years. John can't recall exactly what Harris said but apparently the full colour rendering below was coloured in after Harris had taken the tracing of it which now hangs on my office wall. Clearly the design was just one of those never expected to go into production but gave a possible option as to a styling update to the car. Interesting!

Harris Mann styling sketch for a TR7 upgrade. Now hanging on my office wall.
The coloured-in version, from Harris Mann's own collection.
I had a great email today from Kent Sandiford, who follows this blog. It is another example of how a few words can motivate an individual. Kent also has a TR7 which he is restoring and - amazingly - his story is even longer than mine, starting in 1987 (a year that always reminds me of my heavy metal phase,typified by Whitesnake's 1987 album. Ahem, we were all young once). The car concerned is a 1977 fixed-head like mine, although Kent's is S-registered whereas mine is an "R". What's interesting to me is that my car has a VIN number starting ACG178** whereas Kent's car's VIN is ACG257**, which means that they must have made 7,000 odd cars between mine and Kent's. And of course you can take the word "odd" any way you like. Kent has a great TR7 restoration blog, which puts mine to shame, at http://irestorationtr7.blogspot.co.uk/.

Wednesday 26 December 2012

Me + Followers + Happy New Year

Dear Readers (if there are any!!)

So, it has been nearly a year since I started this little blog about my beloved Triumph TR7, RJW 307R. Originally I started it to give myself a way of looking at my restoration chronologically, so that I could put it all together in one place with photos etc. But to be honest it has turned into a sort of motivator for me in getting the car done, because anyone might be viewing it and therefore I have to get on with it!

That's not to say that I don't care what people think. In fact, I would love to hear what you think of my blog. I am not very techno-savvy but I do understand that it is possible to become a follower of the site, in order get the latest updates etc. So, if you know how to do it, please do become a follower as that will motiovate me no end to get this age-old restoration finished.

By the way, I just realised that there are few photos of me on here, so I thought I should "reveal all". Ok, not all, just me so that there is a person behind the blog.

Me on the left, twirling myhair and enjoying a belly full of Amstel. (Paxos, 1994).
...and me looking rather older. I wish I could twirl my hair now!
Merry Christmas & Happy New Year to you all.

John

Saturday 15 December 2012

Dodwells of Hinckley

When I bought my car in 1993 for a quick tart-up and trip to Greece, it had a dealer sticker in the rear window. It said "Dodwells of Hinckley". The photo shows the car proudly displaying that sticker after the first restoration circa 1994. Unfortunately I failed to appreciate the significance of this provenance and later removed the sticker.


I am a stickler for originality and now wished that I had kept that sticker in the rear window. Neil, however, has done some amazing things with Photoshop and re-created the sticker for me to put in the rear window of the car, once it is restored (and that might be some time!). How he did it just from looking at the photo above, I have no idea.


If anyone knows of a TR-friendly printer who would be willing to make just one of these window stickers, do let me know.

Sunday 9 December 2012

Rear Wing - Nearside - Part 5

It's amazing what difference a week can make to your mindset. After last time's tale of woe, today was actually a pleasurable garage experience. Having gotten into the garage at 10.00am ish, the first job was to try to set the carbs up on the Bond Equipe. This I managed pretty well, although the old thing did disgrace herself by weeing oil everywhere, almost the entire contents of the engine it would appear. Oh well, I'll look at that another day.

Right, back to the TR7. Last time we were here I was moaning as I couldn't get any of the panels to line up. So, after a week or so of contemplation, I decided to have another go. They reckon that problems can be solved if they are broken up into smaller ones, so I smashed all of the panels up and went to the pub. Only joking.

I decided to get the inner wheel arch repair section welded in, ignoring the troublesome rear inner and outer sill panels - they can wait. To my mind it is important to get the wing all lined up with the arch before commencing those repairs, so that's what I decided to do. In the end it was fairly straightforward - I just fitted the rear wing, clamped up the loose inner repair panel, tack welded it in place, removed the rear wing and then welded the whole inner arch section in place between the tack welds. I did have to make a couple of cuts in the repair panel to give it sufficient "flex" around the inner wheel, however, but these were then welded back up. You might be able to spot these in the photos.

It all went pretty well, with nice strong welds which were then ground down (just for fun, as they won't actually be seen), sprayed with zinc-rich primer, and seam sealed.


This is where we got to last time, with the rot cut out This is the section coming off, to be binned.
 
This is looking into the boot. You can see the inside of the rear wing and part of the inner arch repair panel clamped in place.
 

After clamping the rear wing to the arch repair panel, it was tacked in place. The wing was then removed again, leaving the inner arch repair panel where it should be relative to the outer wing. I then started to seam weld the repair panel in place.
The repair panel was then welded in place here and there...
...before stitching between the welds...
...grinding them down...
...and covering with zinc-rich primer and seam sealer.
So, now I have a solid inner wheel arch for the rear wing to sit over. Lord alone knows if the rear wing will still fit over it, but I don't see why not. Next stop on the TR7 Express is aligning the rear inner and outer sill panels. I hope there will be no "leaves on the line". See you next time.

Sunday 2 December 2012

Rear Wing - Nearside - Part 4

It must be nearly a year ago since I started this blog, as it is cold in the garage today. I remember saying that a year ago.

Today was one of those TR7 restoration days when I just wanted to back inside the house and forget all about it. It was cold, and try as I might, I just could not get my panels to fit. The problem is that, once again, everything relates to everything else, i.e. the inner wheel arch lip has to align with the outer wing; the outer wing must fit the whole car including the rear lamp panel. Yet there must also be a fit with the boot floor, and of course the outer and inner lower sill panels. Nothing appears to line up and I am feeling fed up. Weirdly, the only thing that fits perfectly is the entire rear wing.

The areas in red, below, show what I have to make fit.


I just cannot seem to get any of it right, as none of it lines up. The biggest problems are the lower inner and outer sill panels which just don't sit right. In fact they don't even appear to interact with each other at all, even though they are well made. Today I honestly wondered if I had bought panels for the wrong side, but that is not a slight on the supplier- I am sure they will fit eventually. Just not today.

Days like today are the worst, as I can't see when it will get better. Nothing fits, but I know that eventually it will all come together. However this section is REALLY testing me and I am not afraid to ask for help.

If anyone has carried out this repair before and is willing to help, do let me know!


Sunday 18 November 2012

Rear Wing - Nearside - Part 3

Well dear readers, I went out for a curry last night with some friends and consequently this morning had me waking up feeling more Chenai that Speke. It took me a while to get going and to be honest I felt a bit lethargic. Plus, of course, it was cold in the garage.

A big box of goodies arrived on Saturday, containing new inner and outer rear lower sill panels. Although I had some already, I was intrigued by Robsport's claims that theirs are better. So, I ordered a set to try. They didn't have an inner arch repair panel available, but were kind enough to send the entire outer (inner) arch for the same price, on the understanding that I use it to make my own repair panel for the arch.

Don't you love it when you get new things through the post?

I didn't pay much attention to the lower sill panels, as to be honest if I look at all of the panels which connect up to the rear wing repair, I get a bit depressed. So I will leave these for the time being and work on making the rear wing fit properly, along with the inner.

First job was to cut out the rear inner wheel arch, where it was rotten. I used the nibbler to good effect.

The rotten inner wheel arch nibbled out...
...leaving good metal.
Having made the cut, I used the old section as a remplate on the full arch panel, in order to cut out a repair section. The new panel was then cut.

The old panel section cut out and used as a template to make a new repair panel from a full new panel.
 
I then offered this up to the car, aligning it with the rear wing. It all looked ok, but by this time I decided to call it a day.

Saturday 3 November 2012

Rear Wing - Nearside - Part 2

Today was a "D-Day" moment, as I decided to remove the old rear wing. The decision was a tough one, because I am sure that, anecdotaly, TR7 rear wings are very hard to fit. In fact I remembered someone saying "...they just don't fit...", or was that about the front wings? I can't remember.

My original intention was to take the wing off whole, mainly because I like things to be neat and I am a bit "O.C.D." like that. However after consulting the BL repair manual, it was clear that the correct procedure is to cut out the majority of the wing, leaving the welded flanges etc in place, then remove the flanges. So, using a nibbler, I cut out the wing. There was no going back now!

The state of the outgoing rear wing...

...was pretty nasty.


It's gone!

The nibbler made quick work of the panel, and it was pretty satisfying opening up the whole area for the first time since the car was manufactured. The inner wheel arch was in surprisingly good condition with very little rust, although the lip where which the outer welds to is shot.

What really surprised me was that the way the wing was attached to the rear deck panel. The repair manual said to undo the three bolts (a bit like the front wing to nose cone panel) but didn't mention that it was also spot-welded to the closing panel (YKC71). Why bolt it AND weld it? Strange.

Removing the rear wing wasn't that easy, as some of the welds were really messy around the rear lamp panel. Most of the spot welds are straight forward to see and drill out, but sometimes I come across weird welds which look like a cross between MIG and spot. I am pretty sure they are factory welds, but they look almost like they are brazed. I wonder if anyone else has come across these? For example, they held the wing to the rear lamp panel and again the boot floor to the boot floor sub panel (XKC143).

During this session I also removed the rear lower sill panel (inner and outer), which as mentioned previously was made of fibreglass. This involved drilling out the spot welds along the lower edge of the rear wing, inside the boot. Once the structure was weakened, it almost fell out on its own. It was fairly clear that the outer panel had been repaired in the past, with a section grafted on at the bottom of the wheel arch.

Rear outer and (what's left of the) inner lower sill panels.

Looking up from underneath the car into the boot - the panel clamped in place is XKC143. This is where the rear lower sill panel (inner and outer) once sat.

The inner wing area. Note the troublesome filler panel to the left of the boot hinge, sitting on top of the inner arch.

Having removed the wing it was time to offer up the new panel and see how good or bad its fit would be. To my amazement it was pretty good, especially when you consider that it was sitting on top of old welds and rough metal. Even the door gaps were ok.

It fits!


And the door gaps are ok.

My friend Neil came round today and I showed him my progress, and he actually used the term "light at the end of the tunnel". I feel the same. This repair has a very long way to go (2 months, I bet, given that I will only get in the garage at weekends) and actually involves the rear wing, boot floor, lower sill panels et al but I agree with him. Having started with the offside front floor, I have slowly gone around the car and am nearly at the offside again. Deep joy.

Only the other rear wing to do, and the windscreen upper (inner panel).

I decided today that I want the car back on the road for May 2014, which will be the 20th anniversary of when Neil and I took Bessy to Greece. I make that about 19 months from now. Better get a move on!

Sunday 28 October 2012

Rear Wing - nearside - Part 1

Of the thousands of jobs available, I could never be a "p.a.", or "Executive Assistant" as they are now called. Last week I said I wouldn't be able to get in the garage for a couple of weeks, because I had other things going on in my diary. It turns out that I have my weeks wrong, so I am in fact here this weekend (clearly) and next weekend to boot. If I were a p.a., I would be a monumentally bad one.

Anyway, I did get in the garage for a while this weekend to start on what I thought would be a relatively easy job - the rear wing. It has to come off, I have decided, because (a) it has more dents than Romain Grosjean's Lotus and (b) I have a new one, waiting to go on.

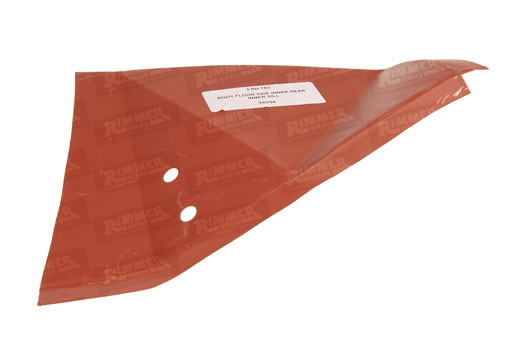
New wing and lower rear sill panel.
To me there are two kinds of repair. One involves making patches, filling holes and generally making it up as you go along in the hope that nobody will ever see them. The other type is the drilling out of old spot welds, removing the whole panel pretty much intact, putting on the new panel and welding it it. The latter is my favourite, because you are starting with parameters that you can deal with, like where the panel is supposed to go, which panels it mates with etc. In effect it is giant Airfix model kit. This rear wing should be like that, as in theory I have to cut out the welds, take off the wing, and put a new one back in the same place. "Simples" as the irritating stuffed creatures from the car insurance ad would say. So, on to drilling out spot welds.

Top of rear wing-to-"B"-post
With a new Draper spot weld drill the original spot welds were cut out along the flange to the "B"-post, which is the bit the door closes on. It amazes me how randomly placed the spot welds are, this is probably due to the Speke (Liverpool, UK) factory having a cup of tea or change of shift between welds.

Rear wing-to-"B"-post
As the spot weld cutter can skid around and sometimes not locate properly, I have my own technique which is effective but very long-winded. First, use a centre punch on the weld, then drill a guide hole with a 1.0mm drill bit, then drill out the weld with the cutter. Sounds ok but it takes ages due to the continual changing of drill bits.

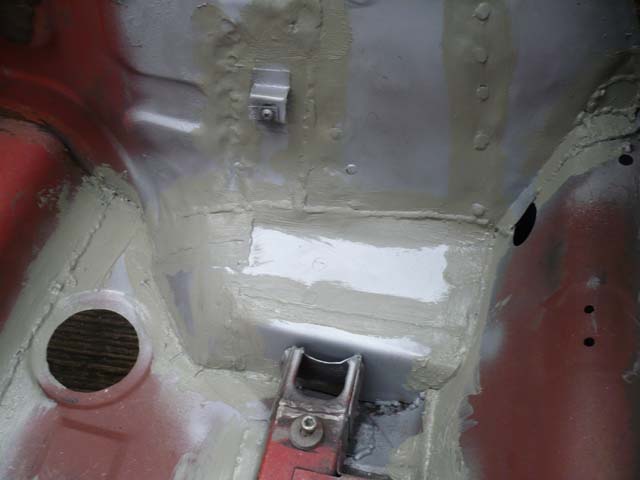
I then moved on to the area below the rear quarter panel (WKC64/5), which I had previously repaired but cunningly left drilled but unwelded at the point it reaches the top of the rear wing.

Top of rear wing to rear quarter panel
Next stop was some work drilling out welds around the boot gutter channels.

Wing to boot flange.
I got a little bored after this and starting poking around in the boot to see what attached to what in there, and as well as finding that there are welds in the most unlikely of places (all to be cut) I discovered some more panels that need replacing (boo!). One is part of the boot floor, but after looking at it for a good ten minutes and wondering what on earth I was going to do about it,  I realised I had a repair panel in stock which I had kind of forgotten about (yay!). It is the area highlighted in red, below. 
Boot floor area needing repair.

So, that will need to come out, too...more spot weld cutting. Forgetting what I have in my shed during excited and frenzied ebay sessions is a common occurrence, with carburettors being the usual theme. I now have three sets on their manifolds. I also bid for and won a rear bulkhead trim panel in incorrect blue the other day - with a view to re-colouring it - forgetting that I already have one in correct black. Doh! I should know better, as I once won a LWB Ford Transit on ebay after a few glasses of wine...

Finally I had a good poke around the rear lower sill panel (WKC207) and discovered to my guilty joy and amazement that it was made almost entirely of fibreglass heaped on top of rusty holes. Guilty joy because it was actually me who had carried out this bodge nearly twenty years ago, and amazement because I had entirely forgotten about it.


Rear lower sill panel, made of fibreglass.

The warm glow of satisfaction I got from doing this repair all those years ago came flooding back to me, and I am proud that for once in my life I am discovering my own previous bodges and not those of someone else. I am pretty sure this one would have lain there undetected for years, such was its splendour.

Apparently it should look something like this.
So, once again my friends, one repair will lead to another. Yes, replacing the rear wing will be a "simple" job of cutting out the spot welds and putting a new one on. But I now have to work on the boot floor, plus fit new inner and outer lower rear sill panels. At the same time, as they are all sort of inter-related. I have a feeling this is going to be like the front end all over again, with weeks of trial fitting and a myriad of clamps. One things is for sure, this blog post is bound to split into subsections! Look out for "Rear Lower Sill Panel Repair, Part 6" and "Boot Floor Repair, Part 108" coming soon to this site.

Maybe I will become an "Executive Assistant" after all.

Sunday 21 October 2012

Rear bulkhead - nearside - Part 5

This is the last time I will be in the garage for a couple of weeks, so I wanted to finish the bulkhead today and be ready for a new project area on my return. Things went well, as most of the work was done last week and today I just had to
  • make a repair panel to extend the inner trailing arm repair panel;
  • grind down the welds inside and outside the car and
  • seam seal everything.
First job was to make up a small panel to butt weld into the hole on the rear bulkhead. Using a bit of offcut steel the repair area was satisfactorily completed pretty quickly. Again, although the area comprises thin steel, I turned the MIG up high and was pleased with how I can now get good penetration without blowing holes. I never thought I would get to this stage with my welding!

New repair section welded in (middle left) and welds ground down. Remember, it used to look like...

...this.
 
After grinding down the welds, I flipped the car onto its side on the spit, and did the same underneath. Everything got a good coat of brushable seam sealer, which actually isn't very brushable and had to be sort of "stippled" on. This reminded me of 90s home improvement shows on the TV, and for the briefest of moments I considered rag-rolling it on.

All seam-sealed and correct.
Before...

...and after. Here's the underside, around the trailing arms, now that the work has been done.

 
So, there you have it folks, a repaired rear bulkhead on a TR7. This repair has been really satisfying, because when it was started I honestly thought it was going to be beyond me. This repair is a bit of a milestone, really. It sounds silly given that the restoration has such a long was to go, but to my mind it is a minor landmark. Why? Because the area is the last hidden bit; the final repair that nobody will see - it is the last bit requiring me to make areas from my stock of steel and create sections that roughly follow the original curves of the car, which nobody will ever appreciate other than an MOT inspector.

From here it is all new outer panels, like rear wings and the rear lamp section - lovely, big, thick panels that everyone will see, metal to metal with no homemade interpretations and all as BL nature intended. Next stop (in a few stations time)... replacing the nearside rear wing.