Sunday 28 October 2012

Rear Wing - nearside - Part 1

Of the thousands of jobs available, I could never be a "p.a.", or "Executive Assistant" as they are now called. Last week I said I wouldn't be able to get in the garage for a couple of weeks, because I had other things going on in my diary. It turns out that I have my weeks wrong, so I am in fact here this weekend (clearly) and next weekend to boot. If I were a p.a., I would be a monumentally bad one.

Anyway, I did get in the garage for a while this weekend to start on what I thought would be a relatively easy job - the rear wing. It has to come off, I have decided, because (a) it has more dents than Romain Grosjean's Lotus and (b) I have a new one, waiting to go on.
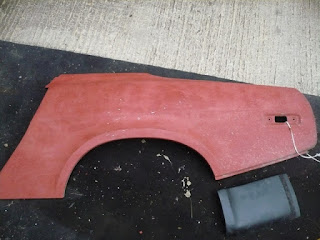
New wing and lower rear sill panel.
To me there are two kinds of repair. One involves making patches, filling holes and generally making it up as you go along in the hope that nobody will ever see them. The other type is the drilling out of old spot welds, removing the whole panel pretty much intact, putting on the new panel and welding it it. The latter is my favourite, because you are starting with parameters that you can deal with, like where the panel is supposed to go, which panels it mates with etc. In effect it is giant Airfix model kit. This rear wing should be like that, as in theory I have to cut out the welds, take off the wing, and put a new one back in the same place. "Simples" as the irritating stuffed creatures from the car insurance ad would say. So, on to drilling out spot welds.
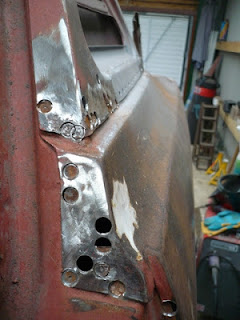
Top of rear wing-to-"B"-post
With a new Draper spot weld drill the original spot welds were cut out along the flange to the "B"-post, which is the bit the door closes on. It amazes me how randomly placed the spot welds are, this is probably due to the Speke (Liverpool, UK) factory having a cup of tea or change of shift between welds.
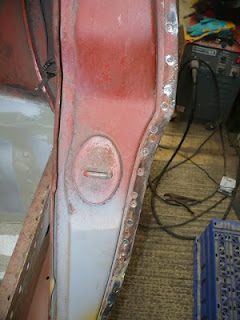
Rear wing-to-"B"-post
As the spot weld cutter can skid around and sometimes not locate properly, I have my own technique which is effective but very long-winded. First, use a centre punch on the weld, then drill a guide hole with a 1.0mm drill bit, then drill out the weld with the cutter. Sounds ok but it takes ages due to the continual changing of drill bits.

I then moved on to the area below the rear quarter panel (WKC64/5), which I had previously repaired but cunningly left drilled but unwelded at the point it reaches the top of the rear wing.
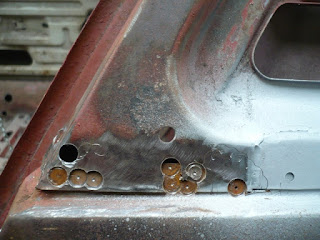
Top of rear wing to rear quarter panel
Next stop was some work drilling out welds around the boot gutter channels.

Wing to boot flange.
I got a little bored after this and starting poking around in the boot to see what attached to what in there, and as well as finding that there are welds in the most unlikely of places (all to be cut) I discovered some more panels that need replacing (boo!). One is part of the boot floor, but after looking at it for a good ten minutes and wondering what on earth I was going to do about it,  I realised I had a repair panel in stock which I had kind of forgotten about (yay!). It is the area highlighted in red, below. 
Boot floor area needing repair.

So, that will need to come out, too...more spot weld cutting. Forgetting what I have in my shed during excited and frenzied ebay sessions is a common occurrence, with carburettors being the usual theme. I now have three sets on their manifolds. I also bid for and won a rear bulkhead trim panel in incorrect blue the other day - with a view to re-colouring it - forgetting that I already have one in correct black. Doh! I should know better, as I once won a LWB Ford Transit on ebay after a few glasses of wine...

Finally I had a good poke around the rear lower sill panel (WKC207) and discovered to my guilty joy and amazement that it was made almost entirely of fibreglass heaped on top of rusty holes. Guilty joy because it was actually me who had carried out this bodge nearly twenty years ago, and amazement because I had entirely forgotten about it.


Rear lower sill panel, made of fibreglass.

The warm glow of satisfaction I got from doing this repair all those years ago came flooding back to me, and I am proud that for once in my life I am discovering my own previous bodges and not those of someone else. I am pretty sure this one would have lain there undetected for years, such was its splendour.

Apparently it should look something like this.
So, once again my friends, one repair will lead to another. Yes, replacing the rear wing will be a "simple" job of cutting out the spot welds and putting a new one on. But I now have to work on the boot floor, plus fit new inner and outer lower rear sill panels. At the same time, as they are all sort of inter-related. I have a feeling this is going to be like the front end all over again, with weeks of trial fitting and a myriad of clamps. One things is for sure, this blog post is bound to split into subsections! Look out for "Rear Lower Sill Panel Repair, Part 6" and "Boot Floor Repair, Part 108" coming soon to this site.

Maybe I will become an "Executive Assistant" after all.

Sunday 21 October 2012

Rear bulkhead - nearside - Part 5

This is the last time I will be in the garage for a couple of weeks, so I wanted to finish the bulkhead today and be ready for a new project area on my return. Things went well, as most of the work was done last week and today I just had to
  • make a repair panel to extend the inner trailing arm repair panel;
  • grind down the welds inside and outside the car and
  • seam seal everything.
First job was to make up a small panel to butt weld into the hole on the rear bulkhead. Using a bit of offcut steel the repair area was satisfactorily completed pretty quickly. Again, although the area comprises thin steel, I turned the MIG up high and was pleased with how I can now get good penetration without blowing holes. I never thought I would get to this stage with my welding!

New repair section welded in (middle left) and welds ground down. Remember, it used to look like...

...this.
 
After grinding down the welds, I flipped the car onto its side on the spit, and did the same underneath. Everything got a good coat of brushable seam sealer, which actually isn't very brushable and had to be sort of "stippled" on. This reminded me of 90s home improvement shows on the TV, and for the briefest of moments I considered rag-rolling it on.

All seam-sealed and correct.
Before...

...and after. Here's the underside, around the trailing arms, now that the work has been done.

 
So, there you have it folks, a repaired rear bulkhead on a TR7. This repair has been really satisfying, because when it was started I honestly thought it was going to be beyond me. This repair is a bit of a milestone, really. It sounds silly given that the restoration has such a long was to go, but to my mind it is a minor landmark. Why? Because the area is the last hidden bit; the final repair that nobody will see - it is the last bit requiring me to make areas from my stock of steel and create sections that roughly follow the original curves of the car, which nobody will ever appreciate other than an MOT inspector.

From here it is all new outer panels, like rear wings and the rear lamp section - lovely, big, thick panels that everyone will see, metal to metal with no homemade interpretations and all as BL nature intended. Next stop (in a few stations time)... replacing the nearside rear wing.

Sunday 14 October 2012

Rear bulkhead - nearside - Part 4

This repair is a bit of a milestone, really. It sounds silly given that the restoration has such a long was to go, but to my mind it is a minor landmark. Why? Because the area currently being fixed is the last hidden bit; the final repair that nobody will see - it is the last bit requiring me to make areas from my stock of steel and create sections that roughly follow the original curves of the car, which nobody will ever appreciate other than an MOT inspector. From here it is all new outer panels, like rear wings and the rear lamp section - lovely, big, thick panels that everyone will see, metal to metal with no homemade interpretations and all as BL nature intended.

But for today, it was all about breaking the back of the area around the rear bulkhead and trailing arms. This little project has also given me a lift, because I was actually dreading the work to come. To recap, it had been patched up with great thick wads of steel, strongly welded right over frilly bits of original TR7. Everything about it was horrible, especially as the area is a mass of structurally vital twists and turns. I could not repair anything that was present - it all had to come out, in a reversal of the assembly at the factory.


This was AFTER I had cut away the previous repair panels. Here you can see what remains of the original panelwork. Don't forget that the suspension trailing arms all connect under here . It is a pretty important area - see the pic below which shows the view through the other side, after the grot had been cut out.

 
This is about where we were in Part 3 - the grot cut away and a trial fitting of the left hand inner trailing arm repair panel (under the clamp).
After welding in the new floor repair panel a few weeks ago, today was all about getting started on putting some strength back in to the upper area. First, I prepared the left-hand side trailing arm repair panel and secured it in place with a self-tapper and some clamps. After some satisfying sizzling noises from the MIG, it was looking very good.

That left the hole above it (which I will do another day) and the remainder of the bulkead area. I made a repair panel for the latter from two sections of steel, which I shaped and cut to fit and then spot welded together. It could have been MIG welded, but I hadn't used the spotter in ages and just needed to have a go with it.

First the lower section was offered up...
...then the upper.
After lots of trimming, cutting and fiddling to make everything line up, I grabbed the MIG and started to weld.


The results again were pleasing, with nice, strong and smooth welds replacing Dot Cotton's attempts of yesteryear. The only bits left to do are (a) bridge the rather large gap on the upper right edge of the lower panel (see below), (b) make an extension panel for the left-hand inner trailing arm section, to bridge the remaining hole (again, see below) and (c) flip the car and just do a spot of remdial welding underneath, where the various bits all meet up (new repair areas, trailing arm mounts and floor).


Okay, so I got carried away in the introduction as there is still a bit to do finishing this area. But mentally I have finished it, as all that remains are the tasks listed above and the final boring bits, like grinding down the welds, painting with zinc-rich primer and seam sealing.

Next stop (in a few stations time)... replacing the nearside rear wing. But I mustn't get ahead of myself as there is still a bit to do.

Next stop, the rear wing replacement. Cool.

Monday 8 October 2012

Let's reflect...

It occurs to me that new readers of this blog will come here and just see a pile of old metal and upside down pictures of a TR7 getting welded, or indeed right way up pictures of an upside down TR7 getting welded.. So, here's a quick overview of how we got here over a 22 year period. Yep, it is taking that long.
 
The car was bought in 1993 for a forthcoming trip by two blokes (Me and Neil) to Greece. I got it welded up so it would pass an MOT.


March 1994. The lad in the foreground is Neil's son. He is 22 now.
 
Quick spray job in Ford Rosso Red, instead of the correct BL Flamenco Red.


Having been right royally tarted up and filled with Isopon, we headed for Greece.


Leaving Dover. So far, so good.


Naturally it broke down, in Italy.


But eventually we made it.

 
Greece was very good for beer and fresh fish, but the car got battered. We decided to come back to the UK.


On the way home. Bessy arriving in Italy from Corfu. Only about 1,200 miles to go with rumbling big ends...


...but we made it home. For some reason I then stripped all the paint off and was left with a bare shell, which I stored in a single garage, then a barn, for years.


Coming home after 11 years in storage, with no paint, interior or engine.


Pulled from the brink.

The car's new purpose built garage.


The other cars enjoyed having a stablemate...


...even if there is a fair bit of work to be done.

So, there you have it. A potted history of this TR7 fixed head and all of the posts recently relate to the current resoration of the car. Now you can head off to various areas of this site and dwell on such things as rust, welding etc with a new insight.


Friday 5 October 2012

Rear Floor nearside Part 2

It's amazing what can be achieved in a fairly short amount of time (and equally amazing how nothing gets done over years, like my TR7). Time spent in the garage today was only about three and a half hours, but I managed to get the rear floor welded in and with relatively few dramas.

Yikes, no floor.

Yikes, still no floor.
 
Before the panel could be welded in place, it was necessary to trim it here and there, plus drill some holes for plug welding. The panel fitted pretty well, although I couldn't get a perfect fit everywhere which resulted in the big drain hole being slightly too near the gearbox tunnel side of the floor.

Ah, that's better. A floor clamped in place.


...and welded in.
The panel was stitched in at intervals to start with in order to minimise excessive heat build up, and I used a sort of "short burst" method of welding which stopped me blowing too many holes. My welding is improving and again today's was done with the MIG turned up high to get maximum penetration. That's quite difficult as much of the metal is very thin. But it worked.
 
Note the plug welds to replace the factory spot welds.


Next job is to grind the welds down, flip the car and get back to work on repairing the rear bulkhead and trailing arm sections.